

How to Use an AED: Step-by-Step Guide
August 24, 2026
An AED can look intimidating at first, especially when you’re standing next to someone who needs help. But the device is built to guide you through the process. It gives clear instructions, tells you when to stay clear, and checks whether a shock is needed.
The bigger question is knowing when to use an AED and what to do before you get one. In a sudden cardiac arrest, every minute matters. Calling 911, beginning CPR, and using an AED as soon as it is available can give the person a better chance of survival.
In this guide, we’ll walk through how to use an AED step by step, cover key safety points, and explain how CPR fits into the response.
What Is an AED?
An AED, or automated external defibrillator, is a portable device used when someone is going through sudden cardiac arrest. It checks the heart’s beats and decides whether an electrical shock may help restore normal beats.
You don’t have to memorize every AED instruction. Once the device is turned on, it guides you through the process with voice and visual prompts. The AED does not replace CPR. CPR helps keep blood moving while the AED checks the heart rhythm and, when appropriate, delivers a shock.
How to Use an AED: Step-by-Step
Now let’s get to the part you probably came here for. How do you actually use an AED? The basic AED steps are straightforward. However, you still need to know what each step means and when to act.
Step 1: Check Responsiveness and Breathing
Tap the person’s shoulders and speak loudly. “Are you okay?” If they don’t respond, check whether they are breathing or not.
If the person is unresponsive and not breathing normally, treat it as a cardiac emergency and activate the emergency response system.
For an untrained responder, searching for a pulse can waste valuable time. This is one reason CPR training is useful. It teaches you how to recognize a possible cardiac arrest and respond without waiting for the situation to become more obvious.
Step 2: Call 911 and Get an AED
If other people are nearby, divide the tasks. Point to one person and say: “You, call 911.” Then tell another person: “You, get the AED.” At the same time, begin CPR.
This is not a situation where you need to complete one task before starting the next. When several people are available, the emergency response can happen together.
If you’re alone with an adult who has collapsed, activate the emergency response system and begin CPR. If an AED is close enough to retrieve without creating a significant delay, get it and use it as soon as possible.
Step 3: Start CPR
Place your hands in the center of the chest. Then:
- Push hard and fast.
- Aim for 100 to 120 compressions per minute.
- Allow the chest to recoil completely between compressions.
- Keep chest compressions going while the AED is being prepared.
- Pause only when the AED needs to analyze the heart rhythm or deliver a shock.
- Resume CPR as soon as the AED allows it.
The goal is to minimize interruptions in chest compressions. Don’t stop CPR just because the AED has arrived. Keep compressions going until the device tells you to pause.
Step 4: Turn On the AED
The AED has arrived. Now the room changes. Someone is still performing chest compressions. Another person opens the AED. Turn it on.
Some AEDs turn on when the lid is opened, while others require you to press the power button. Follow the instructions on the specific device.
Here’s one of the biggest things to remember about how to use an AED: You don’t have to memorize every AED instruction. Listen to the device. Follow the voice prompts. Look at the visual instructions.
The exact buttons and sequence can vary between AED models, so following the device in front of you is more important than memorizing one particular model.
Step 5: Expose the Person’s Chest
AED pads need to be placed on bare skin. Remove or cut through clothing as necessary to expose the chest. Move quickly, but don’t waste time trying to make the situation look neat.
This is an emergency. If the person’s chest is wet, dry the chest before applying the pads. If they are lying in standing water, make the scene safe and move them away from the water when necessary. The AED pads need proper contact with the skin.
Step 6: Apply the AED Pads
Open the AED pads and look at the diagrams. For a typical adult setup, one pad is placed on the upper right side of the chest. The other is placed on the lower left side.
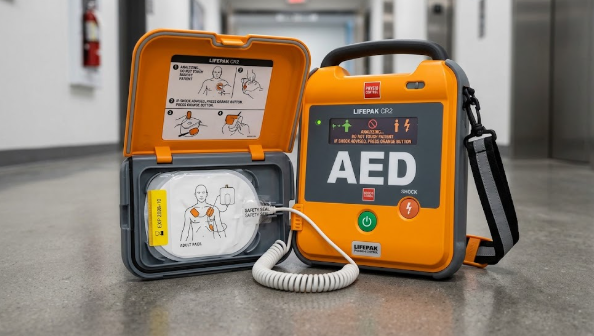
Always follow the diagrams supplied with the specific AED. This matters because AED pads and device instructions can vary.
The pads contain electrodes that send information about the person’s heart rhythm to the AED. The device then analyzes that rhythm to determine whether a shock is needed.
Watch for Common AED Placement Problems
You want the pads to make proper contact with the skin.
Pay attention to:
- Wet skin
- Thick clothing
- Medication patches
- Anything preventing the pads from sticking properly
If a medication patch is covering the area where an AED pad needs to go, follow the AED manufacturer’s instructions and do not place the electrode directly over the patch.
If excessive chest hair prevents the pads from sticking properly, follow the instructions for the AED you are using. The goal is good pad contact, which allows the AED to analyze the heart rhythm properly.
Step 7: Let the AED Analyze the Heart Rhythm
Once the pads are attached, the AED will analyze the person’s heart rhythm. Now comes one of the most important commands in the entire process: Do not touch the person.
Tell everyone clearly: “Stand clear.” Look around. Make sure nobody is touching the person. The AED needs to analyze the heart rhythm without movement or contact interfering with the process. Then the device will tell you whether a shock is advised.
Step 8: If a Shock Is Advised, Make Sure Everyone Is Clear
If the AED says “Shock advised,” This is where you need to slow down for one second. Look around: is anyone touching the person? Move them away. Then say loudly: “Everyone clear!”
Look again, no one touching? Follow the AED’s instructions. Some AEDs require you to press a button to deliver the shock. Fully automated models may deliver it without the rescuer pressing a button. Follow the instructions from the specific device. Never touch the person while a shock is being delivered.
Step 9: Resume CPR and Follow the AED Instructions
The shock has been delivered. Don’t stand around waiting for the person to wake up. Follow the AED’s instructions and be prepared to resume CPR immediately.
If the AED says “No shock advised,” that does not mean the emergency is over. Continue following the device.
Continue CPR until:
- The person shows signs of life.
- Another trained responder takes over.
- EMS arrives and assumes care.
- The scene becomes unsafe.
The AED may analyze the heart rhythm again and provide additional instructions. One shock is not necessarily the end of the response.
CPR vs. AED: What’s the Difference?
CPR and AED use are closely connected during cardiac arrest, but they serve different purposes. Here’s a quick look at how they differ:
| CPR | AED |
|---|---|
| CPR is a lifesaving technique. | An AED is a medical device. |
| Uses chest compressions, with rescue breaths when appropriate. | Analyzes the heart rhythm to determine whether a shock is appropriate. |
| Helps keep blood circulating to the brain and other vital organs. | Can deliver an electrical shock during certain shockable rhythms. |
| Can be started immediately when cardiac arrest is suspected. | Should be used as soon as it is available. |
| Requires the rescuer to perform physical actions. | Provides voice and visual instructions to guide the rescuer. |
Cardiac arrest is a race against time. When the heart suddenly stops pumping blood effectively, the brain and other vital organs no longer receive normal circulation. The difficult part is that you may have to act before professional help arrives. The FDA explains that the combination of CPR and early defibrillation can save lives when used during the first few minutes after sudden cardiac arrest.
That’s why CPR alone is useful, but knowing CPR and AED use together is even more valuable during a cardiac emergency. If you want to strengthen the CPR side of that response, it’s worth understanding what you’ll actually practice in a quality CPR training program.
AED Safety Tips to Remember
Knowing what not to do is just as important as knowing the AED steps.
Keep these points in mind:
- Do not touch the person while the AED is analyzing the rhythm.
- Make sure everyone is clear before a shock.
- Apply the pads to bare, dry skin.
- Do not place a pad directly over a medication patch.
- Follow the voice and visual prompts from the AED.
- Do not delay emergency response while trying to troubleshoot the device.
The good news is that AEDs are designed to guide you. You are not expected to walk into an emergency carrying a mental instruction manual.
Still, hands-on AED training can help because you get to practice the sequence before you’re under real pressure. The FDA notes that AED training is commonly offered alongside CPR training.
What Do You Learn in CPR and AED Training?
A quality course should give you more than a certificate. You should have an opportunity to practice the skills.
Depending on the course, CPR and AED training may cover:
- Cardiac arrest recognition
- High-quality CPR
- Chest compressions
- Rescue breathing
- AED use
- Emergency response
- Adult CPR
- Child CPR
- Infant CPR
- First aid
- Team-based response
- BLS skills for applicable healthcare professionals
You might make mistakes during training. That’s part of learning. An instructor can correct your hand placement, compression technique, timing, and AED sequence before you ever face a real emergency.
How to Choose CPR & AED Training Classes in Georgia
If you’re searching for CPR classes in Georgia, price should not be your only consideration. For example, someone looking for CPR certification in Holly Springs should also check whether the course includes hands-on practice, AED training, and the certification they actually need.
Before enrolling, ask:
Does the course include hands-on practice?
CPR is a physical skill. You should have an opportunity to practice chest compressions and AED use instead of only watching a demonstration.
Does the certification meet your requirement?
Your employer, school, healthcare program, or organization may require a specific type of certification. Check those requirements before enrolling.
Does the course include AED training?
If you specifically need CPR AED training, confirm that AED use is included. Not every course offers the same combination of skills.
Do you need BLS instead?
Healthcare students and professionals may need BLS certification rather than a basic community CPR course. If you’re taking CPR for a healthcare role, check CPR certification requirements for healthcare workers before enrolling.
Does the course match your role?
A childcare professional may need adult, child, and infant CPR. A healthcare professional may need BLS. A workplace employee may need a different course. Your role should guide your training choice.
Looking for CPR and AED Training in Georgia?
Reading about how to use an AED is a useful starting point. But an emergency doesn’t come with a pause button while you think through the next step.
Practice gives you something reading cannot. You get to perform chest compressions, respond to AED instructions, work through a cardiac arrest scenario, and learn how the different parts of the response fit together.
If you’re searching for CPR classes in Georgia, look for training that gives you meaningful hands-on practice rather than focusing only on the certificate. At 1st Treasure Chara Centers, CPR training helps students and professionals build practical emergency-response skills.
Depending on the course, training may cover:
- High-quality CPR
- AED use
- Cardiac arrest response
- Chest compressions
- Rescue breathing
- First aid skills
- Adult CPR
- Child and infant CPR
- BLS skills for applicable healthcare learners and professionals
If you’re looking for CPR and first aid certification, hands-on practice can help you build confidence before you ever face a real emergency. You don’t take CPR/AED training because you expect someone to collapse. But you take it because you want to know what to do if they do.
Frequently Asked Questions About How to Use an AED
What Are the 7 Steps of Using an AED?
The basic AED steps are simple: check the person, call 911, start CPR, turn on the AED, attach the pads, let it analyze the heart rhythm, and follow its instructions. If a shock is advised, clear everyone and resume CPR when instructed.
What Are the Steps to Use an AED?
Turn on the automated external defibrillator, expose the person’s chest, and place the pads as shown on the device. Let the AED check the heart rhythm, keep everyone clear, and follow its prompts. Resume CPR when the device tells you to.
Do You Use an AED Before CPR?
Start CPR as soon as possible while someone retrieves the AED. If the AED is immediately available, use it as soon as it is ready and follow its prompts.
Is AED training included in CPR training?
Many CPR courses include AED training. However, course content varies. If you specifically need CPR AED training, check that hands-on AED practice is included before enrolling.
Latest Posts
August 13, 2024
Is the Role of a CNA the Same as That of a Nurse?
August 13, 2024
Phlebotomists: Vital Contributors to the Healthcare System

August 13, 2024