

Child & Infant CPR: Step-by-Step Guide for 2026
August 21, 2026
When a child or infant suddenly becomes unresponsive, panic can take over quickly. For parents, babysitters, teachers, caregivers, and healthcare workers, knowing child and infant CPR can help you respond with confidence.
Infant and child CPR follow the same basic approach, but some steps change with age and body size. Compression depth, hand position, and rescue breathing all require attention.
This guide explains infant CPR steps and child CPR steps clearly, including when to start CPR, how to perform compressions and breaths, and how to use an AED.
Emergency Reminder: If an infant or child is unresponsive and not breathing normally or is only gasping, activate emergency medical services and begin CPR. Follow the instructions from the emergency dispatcher.
Infant vs. Child CPR: Quick Comparison
Infant and child CPR follow the same basic CPR framework, but the technique changes based on age and body size. The table below highlights the key differences in compression depth, hand position, CPR ratio, and AED use.
| CPR Detail | Infant | Child |
|---|---|---|
| Age | Younger than 1 year* | 1 year to puberty |
| Compression rate | 100–120/min | 100–120/min |
| Compression depth | At least ⅓ of chest depth, about 1.5 in (4 cm) | At least ⅓ of chest depth, about 2 in (5 cm) |
| Compression technique | One hand or two-thumb encircling-hands technique | One or two hands |
| 1 rescuer | 30:2 | 30:2 |
| 2 trained rescuers | 15:2 | 15:2 |
| Rescue breaths | When trained and able | When trained and able |
| AED | Use pediatric attenuator/pads when available and appropriate | Use pediatric attenuator/pads when available and appropriate |
These pediatric guidelines do not cover newborn resuscitation.
The recommendations above reflect the 2025 American Heart Association (AHA) and American Academy of Pediatrics (AAP) pediatric basic life support guidelines.
When Does a Child Need CPR?
A child who is unconscious but breathing normally does not automatically need chest compressions. First, look for normal breathing and signs of life.
If an infant or child is unresponsive and is not breathing normally, including when they are only gasping, treat it as an emergency. Lay rescuers should not delay CPR by checking for a pulse.
A simple way to remember the response is:
- Check
- Call
- CPR
- AED
If you are alone, activate emergency services according to your local emergency system and follow the dispatcher’s instructions while beginning CPR.
For people who regularly work with children, patients, or vulnerable populations, hands-on CPR training can turn written instructions into practical skills.
Infant & Child CPR: Step-by-Step
Most infant CPR and baby CPR steps follow the same basic sequence. The biggest differences appear when you begin chest compressions.
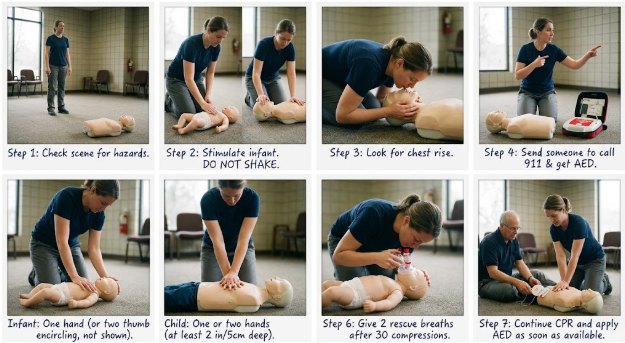
1. Check the Scene
Before approaching the infant or child, make sure the area is safe. Look for hazards such as traffic, fire, electricity, water, or anything else that could put you at risk. Do not put yourself in danger while trying to help.
2. Check for a Response
- For an Infant: Gently stimulate the baby. Never shake an infant.
- For a Child: Tap the child and speak to them.
If there is no response, check breathing.
3. Check for Normal Breathing
Look at the chest and check whether the infant or child is breathing normally. If there is no normal breathing or the child is only gasping, begin the emergency response. Do not spend valuable time trying to diagnose the cause first.
4. Call for Help and Get an AED
If another person is present, give them a clear instruction: “Call emergency services and bring an AED.”
Then start CPR. If an AED is available, turn it on and follow its voice or visual instructions.
For infants and children, use a pediatric attenuator or pediatric pads when available and appropriate. If pediatric equipment is not available, follow the AED manufacturer’s instructions and current CPR guidance rather than delaying treatment.
5. Start Chest Compressions
This is the main point where infant CPR differs from child CPR.
Infant CPR
For an infant, the current AHA/AAP guidelines recommend the one-hand technique or two-thumb encircling-hands technique.
If the rescuer cannot physically encircle the infant’s chest, the heel-of-one-hand technique is recommended. Compress the chest to at least one-third of its front-to-back depth, about 1.5 inches (4 cm).
Child CPR
For a child, use one or two hands, depending on the child’s size. Place the heel of your hand over the lower half of the breastbone, in the center of the chest.
Compress to at least one-third of the chest’s front-to-back depth, about 2 inches (5 cm).
For Both
Keep the compression rate at 100–120 compressions per minute. Allow the chest to return completely after each compression. Keep interruptions as short as possible.
2026 Update: Older CPR resources may still teach the traditional two-finger technique for infant compressions. The 2025 AHA/AAP guidelines changed the recommended infant compression techniques. Always use current CPR guidance and training.
6. Give Rescue Breaths
If you are trained and able to provide rescue breaths, give them with chest compressions. Each breath should take about one second and produce visible chest rise. Avoid excessive ventilation.
For pediatric cardiac arrest, CPR with both compressions and breaths is preferred when the rescuer is trained and able to provide breaths. If you’re taking CPR for work, school, or a healthcare role, it also helps to understand CPR certification requirements in Georgia before choosing a course.
7. Continue CPR and Use the AED
Continue CPR until:
- The infant or child shows signs of life
- Another trained rescuer takes over
- An AED is ready
- Emergency professionals arrive
- You become physically unable to continue
- The scene becomes unsafe
When the AED arrives, use it as soon as possible and follow its instructions.
Reading the steps can help you understand what to do, but CPR is a hands-on skill. If you want to practice the correct compression technique, depth, rescue breaths, and AED use. Our structured CPR training at 1st Treasure Chara Centers can give you that practical experience.
Infant vs. Child CPR: What Actually Changes?
You do not need to memorize two separate CPR procedures.
Remember these key differences:
- Infant: Younger than 1 year, about 1.5 inches of compression depth, and an infant-specific compression technique.
- Child: From age 1 until puberty, about 2 inches of compression depth, using one or two hands based on size.
- Both: 100–120 compressions per minute, complete chest recoil, minimal interruptions, and rescue breaths when trained and able.
For people pursuing childcare or healthcare-related careers, training can also be an important professional credential. If you’re ready to take the next step, learn how to get CPR certification in Georgia and explore the training options available to you.
CPR Ratio for Infants and Children
The CPR ratio for children and infants depends on the number of rescuers.
| Number of Rescuers | Compression-to-Breath Ratio |
|---|---|
| One Rescuer | 30:2 |
| Two Trained Rescuers | 15:2 |
These ratios apply to pediatric CPR without an advanced airway.
Infant and Child CPR Compression Depth
Compression depth is based on the child’s size.
| Infant | Child | |
|---|---|---|
| Minimum Depth | ⅓ of chest depth | ⅓ of chest depth |
| Approximate Depth | 1.5 in (4 cm) | 2 in (5 cm) |
Do not use adult compression depth for an infant or child. The goal is enough depth to create effective compressions while allowing complete chest recoil after each one.
Choking Response for Infants and Children
Choking requires a different response from cardiac arrest. If you want to review the complete first-aid response, see our guide, First Aid for Choking: How to Perform the Heimlich Maneuver.
Conscious Infant
For a conscious infant with severe choking, give 5 back blows and 5 chest thrusts. Repeat the cycles until the object comes out or the infant becomes unresponsive. Do not use abdominal thrusts on an infant.
Conscious Child
For a conscious child with severe choking, give 5 back blows and 5 abdominal thrusts. Repeat until the object comes out or the child becomes unresponsive.
If the Child Becomes Unresponsive
Begin CPR, starting with chest compressions. When you open the airway to give breaths, look inside the mouth. Remove an object only if you can clearly see it.
Never perform a blind finger sweep. Because choking techniques require correct positioning and movement, hands-on training is the safest way to learn them.
Common Child and Infant CPR Mistakes
Keep these points in mind:
- Waiting too long: Start CPR when the child is unresponsive and not breathing normally.
- Using adult depth: Infant and child compression depth is different.
- Compressing too shallowly: Aim for at least one-third of the chest depth.
- Not allowing recoil: Let the chest return fully after every compression.
- Giving too much air: Give each breath over about one second and look for chest rise.
- Using an outdated infant technique: Follow current AHA/AAP guidance rather than older two-finger instructions.
- Forgetting the AED: Use it as soon as it is available.
- Blind finger sweep: Never search blindly for a choking object.
Why Hands-On CPR Training Matters
Reading how to perform CPR on a child gives you information. It does not give your hands practice.
A hands-on CPR training program lets you practice:
- Infant CPR
- Child CPR
- Chest compressions
- Rescue breaths
- AED use
- Choking response
- Compression depth
- Two-rescuer CPR
That practical experience matters because CPR is a physical skill, not just a set of facts to memorize.
Not sure whether classroom instruction or blended learning fits you better? Compare online and in-person CPR training options based on your learning needs, schedule, and career goals.
Practice CPR With Confidence and Get Certified
Reading the steps is a useful starting point. Practicing them is what helps turn those steps into a response you can perform under pressure.
If CPR certification is required for your job, school, or career path, choose a course that gives you the hands-on practice needed to build practical skills.
Explore the CPR certification program and take the next step toward becoming CPR certified.
Final Takeaway
Infant and child CPR can feel intimidating, but the basic priorities are clear. Recognize abnormal breathing, activate emergency help, start CPR when indicated. Use the correct compression technique and depth, provide breaths when trained and able, and use an AED as soon as one is available.
The biggest difference between infant and child CPR is not the entire procedure. It is the way you perform compressions based on the child’s age and size.
If you care for children regularly, do not rely on an article alone. Hands-on CPR training can help you build the physical skills needed to respond when every second matters.
Infant & Child CPR FAQs
Is 15:2 or 30:2 CPR recommended for children?
For child CPR, use 30:2 with one rescuer and 15:2 with two trained rescuers.
What is the correct CPR sequence for a child?
The CPR sequence follows C-A-B: chest compressions, airway, then breathing.
Is hands-only CPR enough for a child?
Compression-only CPR is reasonable if a lay rescuer cannot or does not want to provide breaths. However, conventional CPR with compressions and rescue breaths is preferred for infants and children when the rescuer is trained and able to provide breaths.
Latest Posts

August 13, 2024
Is the Role of a CNA the Same as That of a Nurse?

August 13, 2024
Phlebotomists: Vital Contributors to the Healthcare System

August 13, 2024